Tips And Tricks For Photography
Pinhole Photography
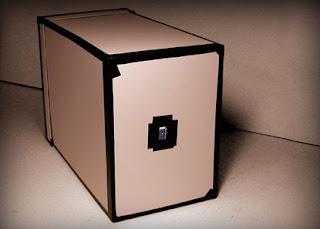
Materials
A photographer example:


to take a hyper-lapse it involves the exact same precautions as a regular time-lapse (taking photos within a specific time limit to show progression throughout that given time) but you also have to show movements within the shots from the camera itself. for example, you could move the camera 4 cm between every photo taken so during the hyper-lapse the camera gets closer and closer to the main focus.
.
heres a quick hyper-lapse me and a couple friends pulled together:

The perfect zooms and crisp focal points make this photo really stand out to the eye and make this image so successful. the medium of the image is digital print inkjet with a very zoomed in view point, this photo was taken with a fast shutter speed and a lower aperture because the foreground of the photo is perfectly in focus and the background is out of focus creating a freeze frame look. the closer the camera got to the subject the more texture of the skin shows in the photo, the paints on the face also add to these textures. yasmines image fits well into the rule of thirds because the eyes are and nose are perfectly in the middle section. the colours of the painted face contrast harshly with the black lines surrounding them and the stillness in the models face add to the surreal look of the composition. the composition makes me feel slightly uncomfortable because of how close the camera is to the subject.


Another one of our assignments was to create a time lapse to show decay, here is my final experiment with dye and ice.
Since the assignment was to show decay or the effects of time I thought ice would be a good portrayal of this because over time it melts into a different matter, liquid, but can also be re froze.
originally I was going to re freeze the ice and time lapse this or just reverse the original already taken but i never got to finishing it! Its much more complicated than it sounds.
My idea for the time lapse was to show ice melting however I wanted to make it a little more interesting by adding dye to the ice because if it came out right it would show the dye running through the ice as it melts. As a bonus it also shows the dye running into the water at the bottom of the plate which could be another crop to show a different change over time.
This particular time lapse idea took 3 tries, what I've learnt from this is that even the simplest ideas can take a long period of time, The first try the camera fell halfway and I only realised once it was too late. The second try failed because the lighting was too dramatic in its changes. This also showed how the tiniest things can change or ruin a whole time lapse for example lighting, perspective or just a small bump on the screen.
 Both these photos i found on the internet. The composition was created by using an effect on photoshop to layer two images together and create the red and blue colours
 This is a more analog example of ed photography, they have collaged the three images together.
WHAT MAKES A 3D PHOTOGRAPH?
3D photos are often layered in photoshop or collaged to show the stereotypical red and blue colours associated with the subject, layers seem to be quite a staple in the digital side of the subject.
the same can be said with the analog side however it is more complicated than just sicking a few photos together they often have to correlate or connect in a way to show what their theme is, for example some 3D work can show political views.
HOW WILL I ANALYSE?
I often analyse my work by looking at what could go wrong eg. loosing the work or accidentally cutting yourself on the knife when cutting the pages. and how to overcome them eg. keeping a close eyes the work, maybe keep it in the box at the front of your class.
the photos of progress so I se how far I've got and also keep the blog updated on how its going and what problems I face.


Materials
- Photographic Paper
- Pinhole Shoebox
- Objects Brought From Home
- Sunglasses
- Newspaper
Processes
- After I left the flap of the box open for 35 seconds I would take it back into the dark room to use the wet process.
- The wet process consists of using 4 liquids: developer, stop and fix.
- You must leave the negative in the developer for two minutes, in the stop for 10 seconds and the fix for one minute. it is very important you leave them for exactly these times to get the best results!
- Once you have put your negative through the wet process it must be washed in a water bath for at lest five minutes. this is also so you can achieve the best results in your work and to make sure the chemistry is all washed off.
- For a photo gram the process is practically the same minus how it begins.
- The difference between the two is that photo grams are not done using a hole in a box it is done instead using an enlarger and what ever objects you want to use. Photo grams start by placing the light sensitive paper on the enlarger and then placing whatever objects you wish on top of the paper.
- These can be objects that describe you, ones you think will add a cool effect or simply just whats laying around.
- Once everything is in place make sure the enlargers timer is set to 10 seconds and press the start button, this should expose the paper for that amount of time.
- Once exposed take the paper over to the chemistry and repeat the wet process.
- The image below shows the enlarger with a try of chemistry.


- If you want to add a cooler effect to your work (or you want to seem more professional) after exposing the paper take it over to the tray of developer but DONT PUT IT IN! Take a paintbrush instead and brush the developer liquid in any pattern over your paper and then resume as normal with the rest of the method.
- This makes it so that only the parts of the paper you brushed over with the developer will show in the pattern you brushed it in!
A photographer example:
- Justin quinnell is a good example for pinhole because of his very unique perspective, here is an example of his work;
- his strange love of the surreal camera was from a past surgery on his eyes where he had a patch where he could only see through a small hole in the middle.
- he calls it "delving into the unknown"
- this photo I particular is one of his most famous, well known images because of the odd perspective.
- quinnell would take these types of photos by placing a smaller pinhole camera in someone's mouth!


Health And Safety In The Darkroom
Some helpful tips to keep you safe in the Darkroom!

- Make sure only a small group enter the darkroom at once, you dont want to overcrowd the room because of the increased risks
- Keep wet and dry areas separate, this could be for obvious reasons like slip hazards or it could also prevent ruined photographs
- Make sure to wear gloves goggles to make sure no chemistry goes anywhere near eyes or skin.
- Add acid to water NOT the other way around!
- Make sure to have a teacher/ parent around in case of emergency or if you simply need help setting up!
- Dont take food, drinks or cigarettes in the darkroom
- Make sure all chemicals and objects are labeled
- Dont wash any of the chemicals down the sink, to avoid any unneeded reactions.
Hopefully this list helped reduce any casualties whilst processing a print!

Description/Analysis
Define:
a spoken or written account of a person, object, or event.
"people who had seen him were able to give a description"
a type or class of people or things.
"it is laughably easy to buy drugs of all descriptions"
Apply:
Subjective/Objective
Define:
- the quality of being based on or influenced by personal feelings, tastes, or opinions.
"he is the first to acknowledge the subjectivity of memories"- the quality of existing in someone's mind rather than the external world.
"the subjectivity of human perception"
the quality of being objective.
"the piece lacked any objectivity"
Apply:
subjective: i think the image looks erie but it needs a main fous because theres too much going on
objecive: the photo is erie because it used a longer shutter speed to let more light in.
Opinion/Assumption
Define:
a view or judgement formed about something, not necessarily based on fact or knowledge.
"that, in my opinion, is right"
a statement of advice by an expert on a professional matter.
"if in doubt, get a second opinion"
Hyperlapses
Hyper-lapses sound a lot more advanced than they really are. a hyper-lapse is a time-lapse but the camera itself is also showing movement, by this you could also move the camera itself or zoom in and out whilst taking the photos. however it is a little more complicated than just moving the camera, if you want the hyper-lapse to be fully stable the camera must be on a tripod and when . moving it must be equally spaced between each photo.to take a hyper-lapse it involves the exact same precautions as a regular time-lapse (taking photos within a specific time limit to show progression throughout that given time) but you also have to show movements within the shots from the camera itself. for example, you could move the camera 4 cm between every photo taken so during the hyper-lapse the camera gets closer and closer to the main focus.
.
heres a quick hyper-lapse me and a couple friends pulled together:
Analysing A Photo
Photo by yasmine wahabThe perfect zooms and crisp focal points make this photo really stand out to the eye and make this image so successful. the medium of the image is digital print inkjet with a very zoomed in view point, this photo was taken with a fast shutter speed and a lower aperture because the foreground of the photo is perfectly in focus and the background is out of focus creating a freeze frame look. the closer the camera got to the subject the more texture of the skin shows in the photo, the paints on the face also add to these textures. yasmines image fits well into the rule of thirds because the eyes are and nose are perfectly in the middle section. the colours of the painted face contrast harshly with the black lines surrounding them and the stillness in the models face add to the surreal look of the composition. the composition makes me feel slightly uncomfortable because of how close the camera is to the subject.

Panograms
Panograms are created by taking a burst of images from two to ten and adding them to photoshop. once in photoshop import all the photos and choose whichever panogram you want and the program will connect the images in that way. remember to flatten the images after!
Heres a few examples of the different types in photoshop;


Timelapses
Another one of our assignments was to create a time lapse to show decay, here is my final experiment with dye and ice.
Since the assignment was to show decay or the effects of time I thought ice would be a good portrayal of this because over time it melts into a different matter, liquid, but can also be re froze.
originally I was going to re freeze the ice and time lapse this or just reverse the original already taken but i never got to finishing it! Its much more complicated than it sounds.
My idea for the time lapse was to show ice melting however I wanted to make it a little more interesting by adding dye to the ice because if it came out right it would show the dye running through the ice as it melts. As a bonus it also shows the dye running into the water at the bottom of the plate which could be another crop to show a different change over time.
This particular time lapse idea took 3 tries, what I've learnt from this is that even the simplest ideas can take a long period of time, The first try the camera fell halfway and I only realised once it was too late. The second try failed because the lighting was too dramatic in its changes. This also showed how the tiniest things can change or ruin a whole time lapse for example lighting, perspective or just a small bump on the screen.
3D Photograpy


WHAT MAKES A 3D PHOTOGRAPH?
3D photos are often layered in photoshop or collaged to show the stereotypical red and blue colours associated with the subject, layers seem to be quite a staple in the digital side of the subject.
the same can be said with the analog side however it is more complicated than just sicking a few photos together they often have to correlate or connect in a way to show what their theme is, for example some 3D work can show political views.
HOW WILL I ANALYSE?
I often analyse my work by looking at what could go wrong eg. loosing the work or accidentally cutting yourself on the knife when cutting the pages. and how to overcome them eg. keeping a close eyes the work, maybe keep it in the box at the front of your class.
the photos of progress so I se how far I've got and also keep the blog updated on how its going and what problems I face.
How To Create A GIF

For one of our lessons we learnt how to create GIFs (GIFs are a burst or selection of photos put together to create a moving image), they are much less complicated than they sound.
To create a GIF it begins by taking a set or burst of photos in the exact same place, you can do this by holding down the shutter or the burst setting on your camera. After you have taken the photos you will then need to upload the images onto your computer and into photoshop to be put in a sequence. This is done by saving the photos into a separate folder on your computer and past this into photoshop as a stack photoshop will then add them as separate layers this is when you can start to experiment. After this open timeline and this will change the speed of which you want your images to move in the GIF, in the window click create frame animation and the layers should come together in order as a GIF. If the layers are not in the right order or are moving at the wrong pace you can alter the speed and the way the frames appear in the timeline window!
My Example is above;
GIFs are becoming much more common nowadays in the social media world than they used to, this is because larger apps and programmes such as Snapchat, Instagram and Twitter are using them as a new way to communicate with others. This is increasing the demands for newer ones in the industry and even musical artists are getting involved in creating some so they can stay up to date with their fans, Because of this new demand many companies will be wanting to make some and be looking for someone with these skill sets and this may be why our teacher decided to focus on them for this time.
Comments
Post a Comment